Using indirect evidence to establish family relationships and reconcile inconsistent information is challenging. Without direct evidence, we must rely on multiple and disparate sources when developing our proof arguments. Interpreting collected data is difficult enough but communicating our conclusions using indirect evidence can be more challenging. Our analysis and conclusions can get buried in text or fail to be appropriately comprehended.
To overcome these challenges, I use a genealogical evidentiary network to visually present collected evidence so relationships between the evidence, the ancestor, and conclusions are easily discernable. It also helps to logically organize the discussion within the body of the research report. As an academic researcher by training, I transferred my skills in communicating complex theoretical constructs to the design of the evidentiary network diagram to do the same for genealogical information.
The figure below is an example of an evidentiary network diagram I used when I constructed the proof argument for identifying the father of William Boyd (1753-1836), who is my 5x great grandfather. The full report where this evidentiary network diagram was used can be found on this website.
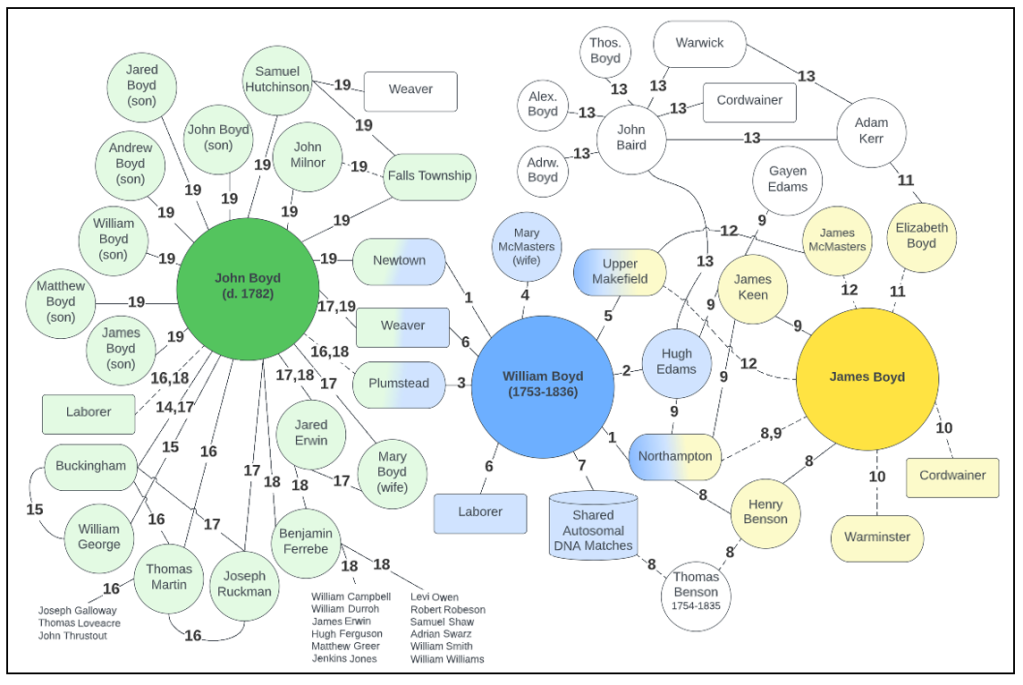
If you think the above diagram is complex, that’s somewhat the point. Indirect evidence is messy. In building proof arguments, vastly different and multiple types of sources are used where relationships and correlations must be clearly communicated. Imagine presenting and interpreting this evidence solely with words and maybe a table or two. Using the evidentiary network, readers can view the big picture while also focusing in on the smaller links between evidence. In the above William Boyd example, you can begin to see that of the two contenders for his father, James Boyd has potentially more meaningful connections with William than does John Boyd, e.g., places of residence and FAN Club members (friends, associates, and neighbors). Other supporting evidence also begins to come into focus when the reader uses both the evidentiary network and the text in the narrated research report.
How to Create the Evidentiary Network
Step 1 – Select Your Software Program
I recommend using Lucidchart online diagramming software for the evidentiary network diagram. It’s super easy to use (see Lucidchart’s quick video tutorial), and there’s a free version if you don’t plan on using more than three single-page documents. You can also use Microsoft’s PowerPoint, but I find it less efficient for editing and designing your diagram.
Step 2 – Organize Your Evidence
After gathering and analyzing your evidence, the next step is to organize and prepare it for inclusion into your evidentiary network diagram. Before I start to draw my diagram in Lucidchart, I take the time to work outside Lucidchart in preparation. I use Microsoft Word to help with organization, but any word-processing software or even paper will do. I list evidence using an outline format. Organize it however it makes sense to you or you believe it might make sense to your readers. For my William Boyd project (see above diagram or the full research report), I grouped the evidence by the three evaluated individuals (William, James, and John) and then chronologically for each individual. In another project (Sarah Wilson McKinstry), I organized evidence by sibling.
Before constructing the diagram in Lucidchart, I recommend preliminarily sketching out the network on paper so you can visualize how the evidence might be related to one another. The idea is not to have too many connecting lines cross one another. That can get messy for the reader. So, group interconnecting evidence together spatially especially if they relate to more than one piece of evidence. For example, in the previously presented diagram, Hugh Edams, who is a pivotal piece of evidence, is located near William Boyd, James Boyd, Northampton, James Keen, and John Baird as Hugh Edams is connected to all these pieces of evidence.
Step 3 – Identify Your Shapes, Colors, and Connecting Lines
Shapes. There is no hard and fast rule in what shapes and colors to use in your evidentiary network diagram. Use what makes sense to you and your readers. For consistency across my reports, I use the shapes shown below to represent the type of evidence used in the proof argument. Although I include a shape for “documents”, I encourage this one not to be overused. In fact, it’s typically not the document itself that is used to build genealogical arguments, but the facts contained within it that are important. For example, consider a tax record listing William Boyd in Northampton Township. The two shapes should be “William Boyd” (circle) and “Northampton Township” (rounded rectangle). The tax record becomes the “Link” or connecting line that ties the two facts together. It’s not necessary to crowd your diagram with an additional shape for the document (square) as the important evidence is William in Northampton.

Colors. If logical organization exists for the collected evidence, I use color to help the reader identify related and important evidence and differentiate competing theories. For example, William Boyd is blue while James Boyd is yellow. Evidence shared between them are part blue and part yellow to highlight the shared association. Lucidchart makes shading easy by changing the shape fill color from solid to linear. Sometimes you might include evidence in your diagram that is not directly related to your overall research question but still provides corollary support for your conclusions. For this type of evidence, I make the fill color “none” or leave it white like the John Baird evidence in my William Boyd example.
Connecting Lines. Lastly, sketch out how each piece of evidence connects to one another. I differentiate between direct and indirect evidence and use solid and dashed lines, respectively, to help the reader gain further insight into included evidence. Although the entire evidentiary network is a collection of indirect evidence, the links between the smaller pieces of evidence can be either direct or indirect. This step can be a little tricky, and you can skip it if it becomes difficult to discern the differences, but I find it is helpful to me when elaborating on evidence in the body of the report.
Direct evidence clearly communicates that the content represented by the two shapes are related, i.e., William Boyd was taxed in Northampton thereby tying him to that location. For indirect evidence, you must deduce or theorize how the content represented by the two shapes are related based on a document or other evidence. For example, consider two witnesses of a will. Direct evidence is that the two witnesses are associated with the will’s author. However, you cannot be certain that the two witnesses know each other. So, any association being made between the two witnesses becomes indirect evidence.
Here’s another specific example. James Boyd is associated with Henry Benson (d. 1752) of Bucks County, Pennsylvania, and descendants of William Boyd share autosomal DNA matches to several individuals who descend from Thomas Benson (1754-1835) of Bucks County. The links between James Boyd and Henry Benson as well as the links between William Boyd and DNA matches are both direct evidence because James Boyd witnessed Henry Benson’s will, and William Boyd’s descendants are part of a genetic cluster with descendants of Thomas Benson. However, the relationship between Henry Benson and Thomas Benson are theorized and thus are considered indirect evidence because Henry’s will does not clearly state how he is related to Thomas Benson, who was the executor of his estate. Likewise, DNA evidence from descendants of Thomas Benson and William Boyd, who are part of the same genetic cluster, have not yet been triangulated (i.e., proven to share the same segment on the same chromosome), and so this connection is also indirect.
Step 4 – Build the Evidentiary Network
If you’ve sketched out your network on paper, transfer it into Lucidchart connecting related evidence and assigning colors. For shapes, I tend to make the focal individual(s) or evidence (e.g., William, James, and John Boyd) larger than other evidence so the reader understands these are the critical elements to which evidence is being attached.
For connecting lines, I recommend first constructing the diagram without numbering the links between evidence. I find it better to wait to number them until after you’ve begun writing the analysis in the report. In fact, I find what works best is that once you have your evidentiary network diagram constructed in Lucidchart without the numbered links, print it out and then use a pencil to number the links on the printout as you write the report. Believe it or not, it can be easier to edit on paper than online. Then, once you finish writing and you’re confident of the links as numbered, transfer the numbers from paper into Lucidchart. To add numbers to your links, just double click the line.
However, if after you enter all link numbers in Lucidchart, you need to change the order of the presented evidence or you discover new evidence to insert into your diagram, it can be difficult to renumber them especially if you have a complex diagram. You may forget which ones have been changed as you go about the diagram editing them. So, if you do have to renumber them after it has been constructed in Lucidchart, I recommend starting with the highest numbered link in your diagram and working backwards. For example, assume you currently have 20 numbered links, and you want to add a new evidentiary link between the current link 8 and link 9 giving the diagram now 21 total links. Starting with link 20, change all 20s to 21, then all 19s to 20, and so on until you get down to the new link between 8 and 9.
Step 5 – Write Up the Evidence
When writing your analysis of the evidence in the body of the report, I recommend initially presenting only the facts for each link with minimal evaluation of the evidence. Save the evaluation for the discussion sections where you look across all evidence and attempt to build your arguments. It is often easier for the reader to comprehend your arguments if all the facts are presented in one section (e.g., a section called “Presentation of the Evidence” with each “Link” detailed one at a time) and then the correlation and evaluation of evidence are made across the entirety of the evidentiary network in another section (e.g., “Evaluation of Evidence”). A final section can contain the summary of your conclusions (e.g., “Conclusions and Summary of Evidence”). In other words, try to organize the evidence into several sections:
- Presentation of Evidence
- Evaluation of Evidence
- Conclusions and Summary of Evidence
Sometimes within the presentation of evidence, you may need to build a smaller proof argument to adequately discuss the current facts or evidence. This proof argument within the report’s larger proof argument is what I call a nested proof argument. I recommend putting the smaller nested proof argument in an appendix so the flow of the larger argument you’re building for the research question does not become convoluted and difficult to comprehend. This is what I did in Appendix 2 in the William Boyd proof argument.
Summary
As we get further back into our family tree, we often don’t find direct evidence easily establishing relationships or accurately conveying vital statistics. As genealogists, we frequently must rely on indirect evidence to draw conclusions and convey our findings in digestible reports for our peers and family members to evaluate. I hope the genealogical evidentiary network diagram can be a useful instrument in your family research toolbox.
Don’t miss new blog posts. Complete the form below to be notified every time I post a new blog.
